TLDR
• Core Points: Curated gallery walls blend planning with personal charm, using a thoughtful layout, varied frame styles, and cohesive color palettes without professional help.
• Main Content: Build a gallery wall through assessment, selection, thematic cohesion, precise layout planning, and careful hanging, while balancing scale, spacing, and accessibility.
• Key Insights: Start with a centralized focal piece, mix frame sizes, establish a consistent color or material theme, and test layouts before committing.
• Considerations: Wall type and hanging hardware, artwork provenance and rotation plan, and the impact of lighting and room flow.
• Recommended Actions: Gather potential pieces, draft layout templates, mark wall, and hang with calibrated tools; review and adjust as needed.
Content Overview
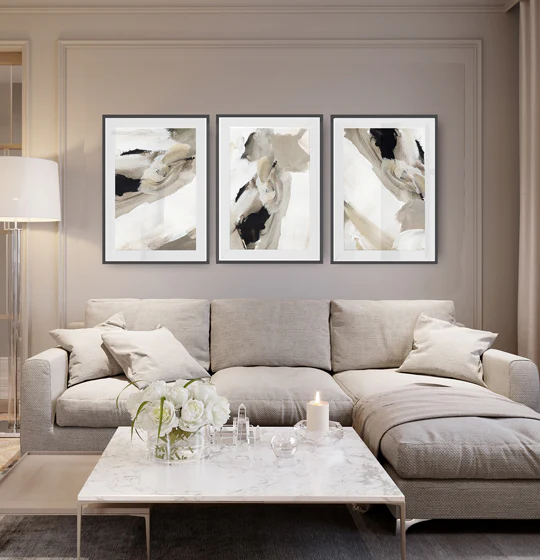
Gallery walls have stood the test of time as one of the most timeless and stylish ways to infuse character and personality into a home. A well-curated gallery wall can function as a focal point in a living room, a narrative in a hallway, or a personal gallery in a bedroom. The appeal lies in combining art, photography, and decorative objects into a cohesive statement that reflects your tastes while complementing the room’s architecture, color palette, and lighting. The challenge is to achieve a curated look without the cost and rigidity of hiring a designer. This guide outlines practical strategies for crafting a gallery wall that feels intentional and polished, yet distinctly your own.
To begin, it’s important to define the purpose and constraints of the space. Consider how the wall will be used: Will it be a visual portal that invites guests to linger, or a backdrop for daily routines? How much wall space is available, and what are the nearby furnishings? Answering these questions helps determine scale, proportion, and the number of pieces needed. The essence of a curated wall is not merely selecting attractive frames but creating a balanced composition that tells a story. You don’t need an expert eye to achieve this; instead, follow a structured approach that emphasizes planning, iteration, and precise execution.
The process can be broken down into five core steps: audit and inspiration, selection and theme, layout planning, preparation and framing, and installation and refinement. Each step builds on the previous one, reducing the likelihood of costly mistakes and increasing the odds of achieving a cohesive result.
Audit and Inspiration
Begin by surveying the space and gathering ideas. Look at the wall’s size, angles, and natural lighting at different times of day. Take measurements, photograph the area, and collect potential art, photographs, and objects that you feel drawn to. Your motive for the gallery wall may be sentimental (family photographs), stylistic (modern black-and-white photography), or eclectic (a mix of antique prints and contemporary canvases). Regardless of the source material, aim for a unifying thread—whether that is color, texture, subject matter, or a recurring motif. This thread acts as the connective tissue that makes diverse pieces feel belonging to a single narrative.
Selection and Theme
Having established what you want to convey, curate a group of works that align with the chosen theme. This does not mean every piece must match perfectly; rather, there should be harmony across the assortment. Consider a mix of media (prints, canvases, textiles, small three-dimensional pieces) and a range of sizes. The key is to avoid visual competition: large, bold pieces should be balanced with smaller items, and similar color tones or materials can help tie disparate works together.
When assembling a collection, start with a few anchor pieces and then fill in with supporting items. Anchors often include the largest frame or most prominent artwork, a family portrait, or a statement piece that embodies the wall’s mood. Supporting pieces should complement these anchors without overpowering them. If your collection includes precious or fragile items, plan for appropriate display protection and mounting methods.
Layout Planning
This phase is about translating the idea into a tangible layout on the wall. A well-planned layout reduces trial-and-error hanging and minimizes hole-patching. There are several effective approaches:
- Centered Grid: Align frames in a precise grid, usually with equal spacing. This works well for a formal or minimalist vibe and is easiest to reproduce.
- salon-style: A dense, eclectic arrangement resembling an old master’s salon. This style encourages organic placement, with frames varying in size and orientation to create an energetic, curated feel.
- Hybrid: Combine a central focal piece with a surrounding constellation of smaller pieces. This often yields a balanced and flexible design.
Practical tips for layout:
– Start by laying out a paper mockup on the floor or wall, tracing each frame’s outline so you can rearrange without unnecessary holes.
– Maintain consistent spacing, commonly 2–4 inches between frames, though larger gaps can work for more contemporary rooms.
– Consider sightlines; ensure the top edges sit at a comfortable height (roughly eye level or slightly above) and that the arrangement relates well to nearby furniture and architectural features.
– Use a unifying system, such as matching frames in a defined color family or using matting to introduce rhythm.
Preparation and Framing
Once the layout is finalized, prepare the frames and artworks. Ensure each piece is mounted securely and can be hung safely. If framing is needed, select frames that either match or deliberately vary in a way that supports the theme. Mats can add breathing room and help unify diverse pieces. For photographs and prints, consider acid-free backing and UV-protective glass to preserve color and condition.

*圖片來源:Unsplash*
When choosing hardware, select appropriate wall anchors for your wall type (drywall, plaster, brick, or stud-based mounting). For heavier pieces, use stud anchors or picture-hanging systems rated for the weight. A level is essential to keep the entire wall straight. A tape measure, pencil, and painter’s tape will help you execute the planned layout with precision before committing to holes.
Installation and Refinement
With the layout prepared and pieces ready, proceed to hanging. Begin with the central or largest anchor piece and work outward to ensure balance. Use a level to confirm alignment and a tape measure to maintain even spacing. If some items are particularly sensitive to humidity or light, position them away from direct sunlight or install UV-filtering glass.
After hanging, step back and assess. It’s common to notice minor misalignments or uneven gaps once you view the wall as a whole. Small adjustments—like shifting a frame a few millimeters or swapping pieces—can significantly improve the overall feel. If you’re unsure, invite a friend or family member to critique the arrangement; a fresh perspective often highlights things you might have missed.
Maintenance and Rotation
A gallery wall is not a static installation. Over time, you may accumulate new pieces or want to refresh the display to reflect seasons, milestones, or evolving tastes. Plan for rotation by reserving a space or a dedicated box with fasteners and backing that allow easy swap-outs. For frequently-changing displays, consider frames that use quick-release hanging systems, magnetic mounts, or modular frames that let you rearrange without re-hanging each piece.
Lighting considerations can dramatically affect the perceived quality of the gallery wall. If natural light is intense, you may need UV-protective glass or frame glazing with anti-glare properties. In rooms with limited light, supplement with adjustable track lighting, wall sconces, or small accent lamps positioned to highlight focal pieces and create depth.
Common Pitfalls and How to Avoid Them
– Overcrowding: It’s tempting to fill every inch, but a too-busy wall can feel chaotic. Leave breathing room around each piece and maintain a cohesive rhythm.
– Inconsistent framing: Mixes of styles can work, but randomness without purpose can read as messy. Choose a guiding rule for frames (color, material, or scale) to maintain cohesion.
– Poor hanging methods: Improper hardware can damage walls and pieces. Use the correct anchors, weight-rated hardware, and level tools to ensure safety and longevity.
– Ignoring lighting: Lighting transforms the experience. Ensure pieces are well-lit without glare and that the arrangement remains visible from multiple angles.
Personalization and Style Considerations
Your gallery wall should speak to you and reflect your everyday life. Consider incorporating non-traditional elements such as textiles, decorative plates, small mirrors, or ticket stubs in frames to tell a story about places you’ve visited, people you love, or moments you want to remember. The art doesn’t have to be expensive; printed photographs, digital art, or scans of cherished images can be professionally printed and framed for a polished result. The goal is a coherent narrative, not uniform sameness.
Accessibility and practicality are also important. If you have children or pets, place the most valuable or fragile items higher up, and select shatter-resistant glass if possible. Use frames that are easy to reconfigure for future updates, especially in high-traffic living areas where the wall will be interacted with regularly.
Future-proofing
A gallery wall is an evolving display. As your collection grows, you’ll be tempted to add more pieces. Plan for expansion by leaving extra wall space, keeping a consistent framework, and maintaining the same layout principles. If you anticipate frequent changes, consider a modular approach: grid-based systems, magnetic or clip-on displays, and frames with quick-change mats allow you to refresh the look without a full rehang.
Conclusion
A gallery wall that feels curated does not require a designer’s touch. By investing time in planning, embracing a unifying theme, and executing precise layout and hanging, you can achieve a sophisticated look that reflects your personal taste. Start with a clear concept, curate a balanced collection, and use careful measurement and layout testing to bring the concept to life. With attention to proportion, color, texture, and lighting, your gallery wall can become a dynamic, enduring feature that enhances your home’s character and atmosphere.
References
– Original: https://abeautifulspace.co.uk/how-to-build-a-gallery-wall-that-looks-curated-without-hiring-a-designer/
– Additional references:
– The Spruce: How to Create a Gallery Wall That Looks Like It’s From a Magazine
– Better Homes & Gardens: How to Plan a Gallery Wall
– Design*Sponge: Gallery Wall Ideas and Inspiration
Note: The above article synthesizes practical, non-professional approaches to creating a curated gallery wall, emphasizing planning, cohesion, durability, and personal expression. All information is tailored to readers seeking a polished, studio-quality result without hiring a designer.

*圖片來源:Unsplash*